How To Upload and Manage Contacts With Constant Contact?
In today’s post, I am going to offer up a brief tutorial on how to upload contacts with Constant Contact to boost your marketing.
Constant Contact is a popular email CRM service that many small businesses (and larger ones, at that) are using.
It would do you some good to learn it!
Perhaps a mentor has told you it’s time to up your email campaign game.
Perhaps you just want to get better at the program because you bought it.
Whatever your reasons are, we are here for you. Let’s get started on showing you how to use this program to your advantage.
Even after you get through this brief tutorial, Constant Contact has resources available that will keep you and your team learning day after day.
Step 1: First Things First: Make Your Email List
An email marketing list is the group you will be sending correspondences to.
A pet supply company might have a list that caters to dog owners, to parrot owners, to reptile owners, and so on and so forth.
It’s not a problem to send a mass email to everyone, but by creating a specific list for each group you target that person’s interests, and it becomes easier to offer promotions to those specific groups: for instance, you might offer a free sample of food with the purchase of a food and water bowl for your “Dogs” email list.
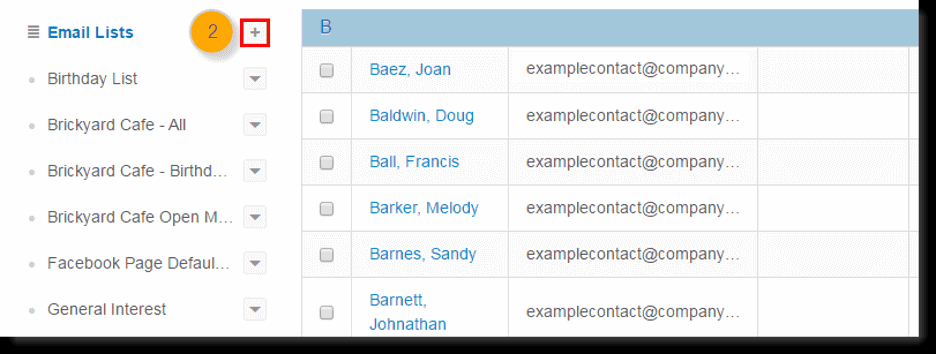
To do this, simply click on “Set up your first list” by going to the home menu. Type out the name of your list, and then enter at minimum one email.
You don’t need to manually enter all of them, as we have a trick to show you how to do this in an easier fashion coming up in the next section.
Step 2: How to Upload Contacts With Constant Contact
There are a few ways how to upload contacts With Constant Contact. Begin by clicking on “Contacts” which is located in the menu on the left. Now click on “Add Contacts” which is located at the top right.
There are several options from which to choose, depending on where you saved your contacts:
You can enter one contact manually.
You can Enter a list of contacts manually. This is good if you handwrote your emails onto a sheet of paper; for instance, some businesses ask customers to write down their emails, such as in a guestbook, so they can send offers. Simply click “Type in/Paste contacts,” and you can enter them in using the boxes provided to you.
You can enter them in bulk. Do you have a list of emails saved in your files on your comp? If so, copy and paste them as a bulk order to make it easier. Click on “Type in/Paste contacts” and then go to the next tab, which is titled “Paste Names and Emails.”
Enter Them Using Website Forms: If you don’t know what this is, or don’t have any yet, we are going to cover this later on, so keep on reading!
Import Via Your CRM: Just as you get with GMAIL or Outlook, Constant Contact lets you bring in leads via Salesforce. Go to “Search MarketPlace,” and there you will see other popular CRMS such as NetSuite and ACT.
Import contacts via Outlook or Gmail: Do you already have a work email that’s pre-loaded with clientele? Use this option.
Select which contacts you want to add based on their individual categories: You might have “Vendors,” “Teammates,” “Clientele,” and so on. Given that you cannot pick out emails one by one, it’s probably best not to import from your personal email.
Enter Contacts Via Spreadsheet: Got contacts saved in a Point of Sale system? Got a spreadsheet of emails? We will talk about how you can enter them from these methods.
How To: Use A Spreadsheet To Add Contacts
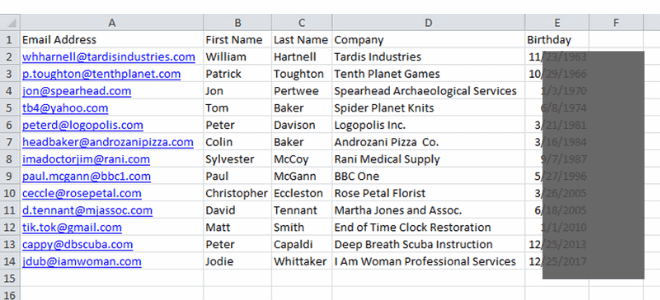
You can import a list of contact email addresses using a spreadsheet, a text file, or vCard file. Look for files with extension types such as XLS, XLSX, CSV. vCard files are saved as VCF. Text files are, of course, just .txt. These can all be directly imported to Constant Contact.
Bear in mind this can affect the price you pay, as it is based upon the type of email plan you pick and the number of active contacts that you have as part of your account. To ensure the upload goes off without a hitch, format the spreadsheet first. This ensures the data is translated into the correct place once in your records.
Here are some tips:
- Make sure to label column headings so that they are easily recognized by Constant Contact.
- Be sure to use proper file types as listed above and organize your content so as to avoid multiple tabs
- Make sure you have an email address for each individual contact.
Now it’s time to upload!
- Begin by clicking on “Contacts”
- Now click “Add contacts” and then click “Upload From File.”
- Then pick out the file or spreadsheet you want.
- Go over the columns to make sure they have correct headings.
- Check that you’ve read and agree to/understand the Constant Contact Anti Spam Policy, by selecting “Got It.”
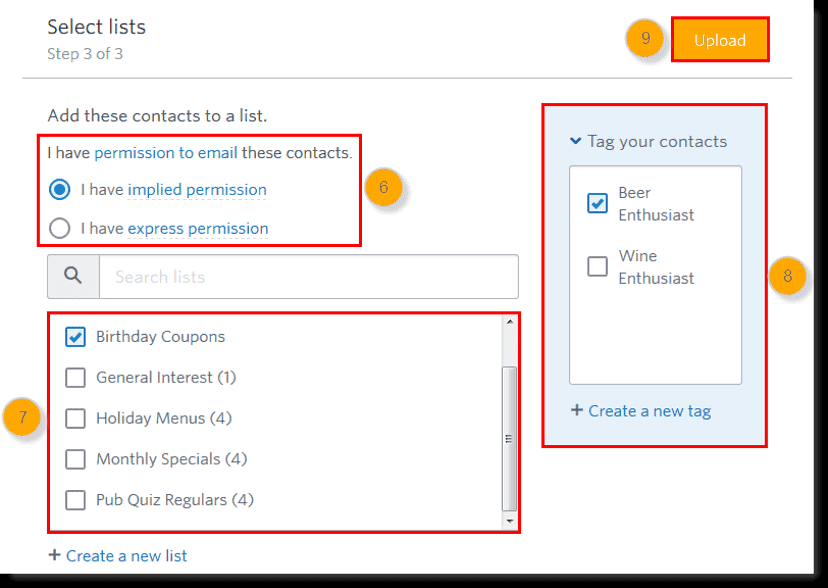
- Only if you have enabled “Advanced Email Permissions,” choose the sort of permission you have to message your contacts.
- Now choose the list you would like to add your contacts to. You may also make a new list.
- This is optional: You can click “tag your contacts” to pick out tags or make some new ones.
- Now click upload. And you’re done!
Uploading is made easy- suppose there are duplicate email addresses in your Constant Contact Account. If that is the case, the program automatically updates that contact using any new info from the spreadsheet you uploaded.
Updates are performed at the contact level. This means if you import to a new list, the contact will be updated and stay on the list that is already existing, and then is added to the new list alongside the new contacts from your spreadsheet.
If you import to an existing list, the contact will be updated, and new contacts are then added to the list.
Step 3: How To: Send An Email

Now that you’ve got your lists all made up, and contacts all saved, it’s time to send some emails-yay!
Here is how you can create a simple, one-time send email.
Begin by clicking on the “Create” button- It is orange- and pick, “Send an email.” You will then be directed to a whole variety of awesome templates from which to choose.
Now click on the template you like, and you will go to the Editor, where you can add images and text as you like. You can add sections by choosing “Layout” and dragging it into the email.
Now you can type out the message. Keep in mind this is going to ALL of your people on ALL of your lists, so keep it appropriate! Using the “Insert” tool is how you will send emails to one person individually.
The Insert tool is great because you can add in your recipient’s first and last name or organization. It changes for each message sent, so all your contacts get a personalized message – how cool.
Just click “Insert” below your color and font size selectors.
Once the email is set up as you like it, hit “continue.” Once you are on the next page, you can edit the subject line and select the lists this email is intended for. You can then schedule it to go out later or send it right away.
Step 4: Getting Newcomers To Sign Up
Now that you have a mailing list established, how do we get people to sign up?
Constant Contact makes it easy. Make a form using Constant Contact and put it on your site. Once they fill it out, they will be added to one of your lists in Constant Contact.
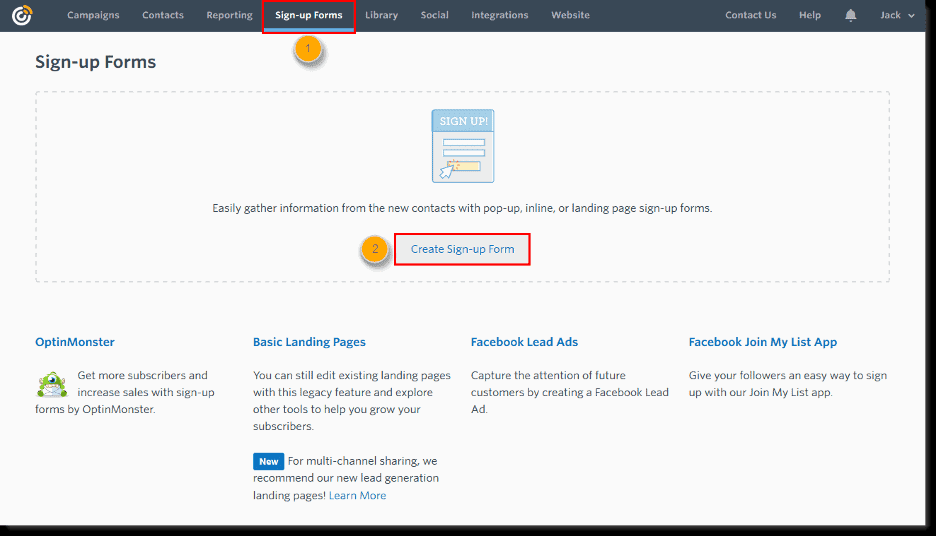
So how do you do it? Start by clicking “Contacts” and then “Sign Up Tools” located at the top.
Then click on, “Create a signup form.”
Add in your descriptions and title for your form. Add the contacts you want to send this to.
Next, lay out the info you want customers to enter. You might just want their email, or maybe you want their name, birthday, or something else so you can send a deal for their special day.
Next, add in your logo and make the colors your own. BAM! A lovely signup form just for you and your organization.
Now you can add it to your page simply by going back to the “Signup Form” page. Select the “Embed Code” option and copy and paste the code onto your site.
You can also have the company host the form for you. Simply click on “Form URL” and you get a URL that contains your form. Now share it on social media or put it on your site!
Conclusion
How to upload contacts with Constant Contact has never been so essay!
Now you know how to upload contacts with Constant Contact in the most efficient manner. I hope this tutorial on how to use Constant Contact has been helpful for you. With time, this will become second nature, and you will be firing off prize-winning emails in your sleep. Get ready to drive results. Good luck, and have fun!
Click below to learn more about Constant Contact


